Can I Build a Media Wall Myself? A DIY Guide for UK Homes
Yes, you can build a media wall yourself—no cape required! With basic tools, planning, and a sprinkle of patience, your dream setup (even with a cosy media wall fire) is totally doable. Stick around for expert tips, clever hacks, and how to avoid turning your lounge into a lumber yard.
Is Building a Media Wall a Realistic DIY Project?
Understanding the Scope of the Project
Let’s be honest — building a media wall sounds a bit daunting at first. It’s more than popping up a few shelves and calling it a day. We’re talking TV mounts, built-in shelving, cable management, and maybe even an electric fire for that cosy touch.
But here’s the thing — break it down into parts, and it becomes surprisingly doable. With some planning and a bit of elbow grease, this can be your next proud DIY moment.
Simple Shelving vs. Integrated Units
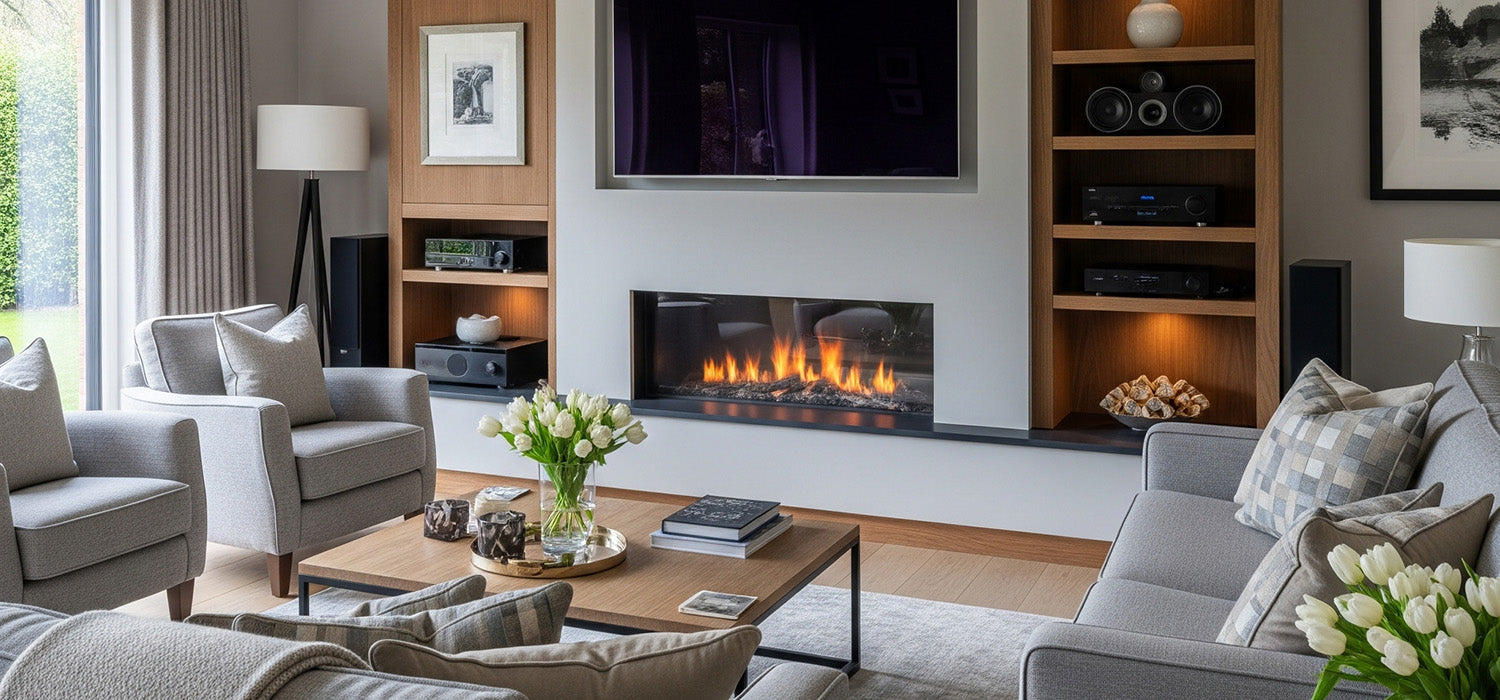
You could go for a basic shelving unit and slap the telly in the middle. But a fully integrated media wall? That’s where things get stylish. Think clean lines, clever storage, built-in lighting — a real centrepiece.
It takes more effort, sure. But the finished look? Worth every screw.
Considerations for Weight and Stability
TVs aren’t exactly featherweight. Add soundbars, shelves, and maybe a few books, and you’ve got a lot of pressure on your wall.
Before you grab your drill, make sure your wall can take the load. Studs, brackets, and sturdy timber will be your best mates here.
Assessing Your Skill Level and Tools
Basic Carpentry Skills
You don’t need to be a master carpenter. But if you’re confident using a saw, drill, and tape measure — you’re off to a solid start.
Think: cutting timber straight, drilling pilot holes, assembling flat surfaces. If you’ve ever built flat-pack furniture and managed to stay sane, you’ll be fine.
Essential Tools Required
Here’s what you’ll need in your DIY toolbox:
-
Measuring tape, spirit level, and laser measure
-
Circular saw or jigsaw
-
Drill, screwdriver set, stud finder
-
Safety gear (goggles, gloves, dust mask)
If you’re missing a tool or two, check local hire shops. It’s cheaper than buying, especially for one-off projects.
When to Call in the Professionals
Complex Electrical or Structural Changes
If your design involves moving plug sockets, hiding wires in the wall, or cutting into structural elements — it’s time to call in the pros.
No shame in it. A qualified electrician or builder will keep your home safe (and your insurance intact).
Time Constraints and Budget
DIY does save money — but it eats up time. If your weekends are packed and your patience thin, hiring a professional might be the less stressful route.
Think long-term. A half-finished media wall isn’t doing anyone any favours.
Planning Your Media Wall: Design and Functionality
Defining Your Needs and Desires
Storage Requirements (Media Devices, Decor, Books)
Start by asking yourself what’s going on the wall. Just a TV and a speaker? Or are you hiding consoles, Sky boxes, books, or family photos?
Plan shelving around real needs — don’t build a shrine to clutter.
Integrated TV Mounting
Mounting the TV securely is a top priority. Get the height right, make sure the bracket is supported, and leave space behind for plugs and cables.
Trust us — nothing ruins a clean look like dangling wires.
Aesthetics and Room Integration
Your media wall should feel like part of the room, not something tacked on. Match colours, materials, and proportions to your existing décor.
This is where Pinterest boards and moodboards earn their keep.
Measuring and Layout
Wall Dimensions and Obstructions
Measure everything. And we mean everything — from floor to ceiling, across the width, around sockets, radiators, and switches.
Spot problems early, and your future self will thank you.
Optimal Viewing Distances
The sweet spot for telly viewing is about 1.5 times the screen size. So, for a 55” TV, you’ll want to sit around 2 to 2.5 metres away.
Don’t mount it too high, either — nobody enjoys a stiff neck.
Creating Detailed Blueprints or Sketches
Rough sketches help, but digital tools like SketchUp or HomeByMe let you test ideas in 3D. It’s like rehearsal for your wall.
No design degree required — just a good eye and a bit of patience.
Choosing the Right Materials
Wood Types (MDF, Plywood, Solid Wood)
MDF is smooth and great for painting, plywood’s sturdy and budget-friendly, and solid wood? Gorgeous, but pricey.
Choose what works for your look and your wallet.
Finishes (Paint, Veneer, Laminate)
Want the freedom to redecorate? Go for paint. Prefer a rich, woodgrain feel? Veneer’s your friend. Laminate’s a low-fuss option too — wipe-clean and modern.
Hardware (Brackets, Hinges, Drawer Slides)
Don’t scrimp here. Wobbly brackets and cheap runners are a pain. Get good gear — it’ll hold everything together properly and last.
Step-by-Step Guide to Building Your Media Wall
Preparation and Safety
Clearing the Area
Empty the space. Protect floors and skirting with dust sheets or old blankets. You’ll thank yourself when cleanup time comes.
Personal Protective Equipment (PPE)
Safety first. Goggles, gloves, a dust mask — especially when cutting or sanding. Your lungs and eyes are not replaceable.
Framing and Structural Support
Attaching to Wall Studs
Find the studs (a stud finder makes this easy). Secure your timber frame directly to them — that’s where the strength lies.
Creating a Sturdy Base
Your media wall starts at the base. Get this solid, level, and square. Everything else builds on top of it.
Building the Cabinets and Shelving
Cutting and Assembling Carcasses
Measure, cut, assemble. Double-check squareness. Use wood glue and screws for extra strength.
Attaching Shelves and Dividers
Shelves can be fixed or adjustable. Just make sure they’re straight, level, and strong enough to handle whatever you plan to store.
Integrating the TV Mount
Reinforcing the TV Mounting Area
Use plywood backing or double studs. TVs are heavy — no one wants a cracked wall or a crash mid-movie night.
Concealing Cables (Cable Management)
Use cable conduits or hide wires behind panels. Plan your cable routes before you build — retrofitting is a headache.
Finishing Touches
Sanding and Priming
A quick sand and prime smooths out the rough bits. Don’t skip this — it’s the difference between DIY and done-right.
Painting or Applying Finish
Choose a colour that works with your space. Use a roller for smooth finishes, or spray if you're feeling confident.
Installing Doors, Drawers, and Hardware
Time for the final pieces. Line everything up, test the openings, and admire your handiwork.
Essential Considerations for a Successful Media Wall DIY
Electrical and Cable Management
Planning for Outlets and Power Strips
Make sure sockets are in the right place. Add extras if you’ve got lots of kit — consoles, routers, speakers — they all need power.
Hiding Wires and Cords (Conduits, Cable Trays)
Keep it tidy. Plastic conduits, trunking, or in-wall cable kits keep everything sleek and safe.
Ventilation for Electronics
Don’t box your devices in. Leave air gaps or fit small vents to stop things from overheating.
Lighting Integration
LED Strips
Add LED strips behind shelves or the telly. It’s an easy upgrade that makes your wall look designer-level.
Spotlights for Display
Got collectables or artwork on the shelf? Fit some mini spots to show them off.
Budgeting for Your DIY Media Wall
Material Costs
Expect to spend £300–£700, depending on what you choose. MDF is budget-friendly, solid oak — not so much.
Tool Rental/Purchase
Don’t forget about tools. Renting can save money, especially for saws or sanders you’ll only use once.
Unexpected Expenses
Factor in mistakes, spares, and changes. Add a 15–20% buffer to whatever you think it’ll cost. You’ll probably need it.
Common Challenges and How to Overcome Them
Dealing with Uneven Walls
Old houses = wavy walls. Use filler, shims, or back battens to straighten things up.
Achieving Professional Finishes
Take your time sanding and filling gaps. Clean lines and smooth edges make a world of difference.
Troubleshooting Electrical Issues
If a wire’s in the wrong place or something sparks — stop. Call a qualified electrician. DIY is great, but safety’s greater.
Alternatives to Building a Full Media Wall
Freestanding Media Consoles
No tools required. Great for renters or anyone who changes their mind often.
Wall-Mounted Shelving Units
Stylish and minimal. Can look fantastic with clever placement and lighting.
Custom-Built-Ins by Professionals
Got the budget? Hire a joiner for a flawless finish and a stress-free build.
Conclusion: Enjoying Your Custom Media Wall
Building your own media wall is more than just a home upgrade — it’s a brag-worthy project you’ll be proud of every time you sit down to binge your favourite show.
It takes effort, yes. But with careful planning, a solid design, and a dash of determination, you can absolutely do it yourself.
Just don’t forget to fire up that media wall fire, grab a cuppa, and enjoy your masterpiece.
Other content we think you'll love
- How to Build a Stylish Media Wall with TV & Fireplace
- Can You Build a Media Wall Over a Radiator? A Stylish Guide
- Can You Build a Media Wall on Carpet? Tips for a Stable Setup
- Can You Build a Media Wall Around a Fireplace? A Cosy & Stylish Upgrade
- How to Build a Media Wall on a Chimney Breast (UK Guide)
- Can You Build a Media Wall in a Council House? A Practical Guide
- The Ultimate Guide to Buying a Pre-Made Media Wall in the UK
- How to Attach Plasterboard to a Media Wall: A Step-by-Step Guide
- How Deep Should Your Media Wall Be? A Guide to Perfect Fit & Function
- Are Media Wall Fires Safe? What Every UK Homeowner Should Know
- Can You Build a Media Wall Without Plastering?
- How is a Media Wall Built? A Step-by-Step DIY Guide
- MDF vs Plasterboard for Media Walls: Which Should You Choose?
- What Are the Disadvantages of Media Walls? A Cautionary Guide
-
What is a Media Wall? The Ultimate Living Room Glow-Up