Media Wall Acoustic Panels: Enhance Sound & Style at Home
Tired of your TV sounding like it’s stuck in a tin can? Media wall acoustic panels are the secret sauce for epic sound—paired perfectly with your Media Wall Fire setup. They kill the echo, boost clarity, and look great too. Short answer: better sound, less noise. Keep reading to hear why!
Why Your Media Wall Might Be Harming Your Sound Quality
You’ve finally sorted your dream media wall. The big screen’s mounted, the shelves are floating, and there’s even a Media Wall Fire flickering underneath. But something’s off—the sound feels distant, unclear, or just too loud.
Let’s talk about why.
Understanding Echo and Sound Reverberation
When you play sound in a room—music, dialogue, whatever—it doesn’t just travel directly to your ears. It bounces. Off the walls, the floor, even the ceiling.
This bounce, or reverberation, can muddle the audio, making everything feel blurred or too sharp. In big rooms or ones with lots of bare walls and hard flooring, this is especially noticeable.
The Impact of Hard Surfaces on Audio Clarity
Media walls are often built around hard materials—MDF units, painted plaster, glass, stone-effect cladding. While stylish, these surfaces reflect sound rather than absorb it.
The result? You get that dreaded echo chamber effect. Great for shouting across a cathedral, not so much for enjoying a quiet Netflix night in.
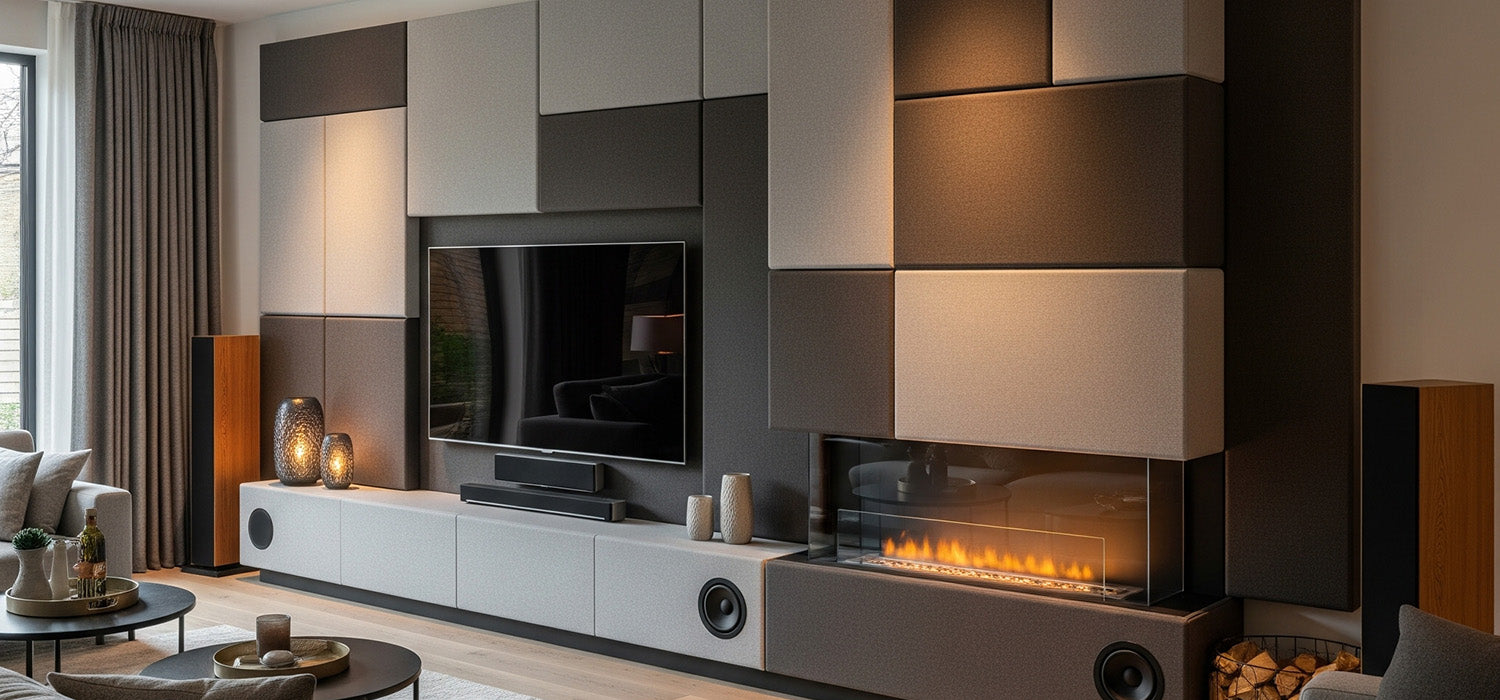
The Solution: Acoustic Panels That Actually Look Good
Luckily, the fix doesn’t involve ripping out your media wall. Modern acoustic panels are designed to complement interiors, not clash with them. And they work—really well.
Types of Acoustic Panels for a Stylish Media Wall
You don’t need a recording studio setup to benefit from acoustic panels. The right design can elevate both your room’s look and its sound quality.
Wooden Slat Acoustic Panels (Akupanels)
These have become a go-to for interior designers. Made from timber slats over felt backing, Akupanels bring warmth and texture to a space, all while absorbing sound reflections.
They work especially well in contemporary or Scandi-style homes, and look stunning when stretched across an entire wall.
Fabric-Wrapped Sound Absorbing Panels
Want something soft, simple, and super effective? Fabric panels do the job. They’re available in just about any colour or texture and can blend seamlessly into your existing colour scheme.
They’re especially good in home offices, where clearer calls and fewer distractions make a big difference.
Moss Wall Art Panels
These are a brilliant choice if you’re leaning towards a natural, biophilic look. Preserved moss isn’t just pretty—it absorbs mid- to high-frequency sounds incredibly well.
It’s also maintenance-free. No watering. No trimming. Just sound-absorbing greenery, forever.
Custom-Printed Art Panels
Fancy combining acoustic treatment with a personal touch? Get your panels printed with your favourite artwork, landscapes, or even family photos.
You get better sound without giving up valuable wall space to plain panels. Great for living rooms or playrooms where style still matters.
How to Integrate Acoustic Panels into Your Media Wall Design
It’s not just what you use—it’s how you use it. Smart panel placement can double as bold design.
Creating a Feature Wall with Slat Panels
If your media wall is the room’s centrepiece, give it the treatment it deserves. A full slatted wall creates a warm, architectural backdrop that frames your TV beautifully while taming acoustics.
It’s modern, minimalist and makes the whole space feel more “finished”.
Flanking the TV for a Symmetrical Look
Installing panels to the left and right of your TV is a great way to maintain balance. You’ll not only absorb those tricky side reflections but also create a more grounded, intentional design.
Bonus points if you echo the material elsewhere in the room.
Lining the Back of Alcoves
Got alcoves either side of your media wall? Line the backs with fabric or moss panels for subtle absorption. It softens the sound, breaks up the hard surfaces, and gives often-neglected spaces some love.
Installation Guide for Homeowners
Don’t worry—this isn’t as technical as rewiring your house. With the right approach, you can fit most acoustic panels yourself over a weekend.
Where to Place Panels for Maximum Acoustic Impact
To get the best results, think strategically:
-
Behind your TV or speakers to absorb direct sound
-
On side walls at ear level to reduce first reflections
-
Opposite large hard surfaces to cut down on echo bounce
You don’t need to cover every wall—just enough to calm the chaos.
DIY Installation: A Step-by-Step Process
-
Plan your layout. Use masking tape to visualise panel placement before drilling anything.
-
Use a spirit level and pencil to mark positions.
-
Fix panels using adhesive strips, screws or mounting brackets (depending on type).
-
Step back, admire your handiwork, and enjoy the sound test.
For slatted panels or heavier options, wall plugs and a drill will be your best mates.
Hiding Wires Behind Your Panels
If you’re running power cables, HDMI leads, or lighting wires, slat panels are brilliant. The spacing allows you to snake cables behind without needing to chase the walls.
Just be sure to keep things neat and away from any heat sources.
Do Acoustic Panels Really Make a Difference?
In short—yes. Even a handful of well-placed panels can completely change how a room sounds.
Speech becomes clearer. Music gets depth. You stop cranking up the volume just to hear the dialogue. And as a bonus, the room feels calmer, less noisy, and more comfortable overall.
Final Thoughts: Small Change, Big Impact
Media wall acoustic panels might sound niche, but they’re one of those changes that make you wonder how you ever lived without them.
Whether you go bold with slatted wood or discreet with fabric panels, they give you better sound, better style, and a room that just works.
Because let’s face it—good design should sound as good as it looks.
Other content we think you'll love
- Media Wall Accessories: Style, Function and Wow Factor
- Media Wall Accessories Ideas: How to Style Your Space with Flair
- Creative Media Wall Alcove Ideas for Stylish, Functional Homes
- Media Wall Alcove Ideas: Stylish Designs That Maximise Space
- Media Wall Access Panels: Why You Shouldn’t Skip This Clever Feature
- Media Wall Back Panels: Stylish Ideas to Elevate Your Space
- Media Wall Boards: The Complete Guide to Strong, Safe Builds
- Media Wall Box: The Secret to a Sleek, Cable-Free Setup
- Built-In Media Walls: Transform Your Living Room with Style and Function