Media Wall Construction: How to Build the Ultimate Feature Wall
Dreaming of a sleek Media Wall Fire setup that screams “wow” every movie night? Short answer: Yes, you can build one—without wrecking your weekend or your walls. From timber frames to LED flair, we’re breaking it down step-by-step. Stay tuned for tips, laughs, and zero dodgy DIY drama.
Understanding Media Wall Construction: What's Involved?
Let’s be honest: a media wall isn’t just somewhere to plonk your telly. It’s a modern centrepiece. One part storage hub, one part design feature, and one part bragging rights.
Whether you’re crafting a cosy family corner or a statement lounge backdrop, understanding what goes into the build is key.
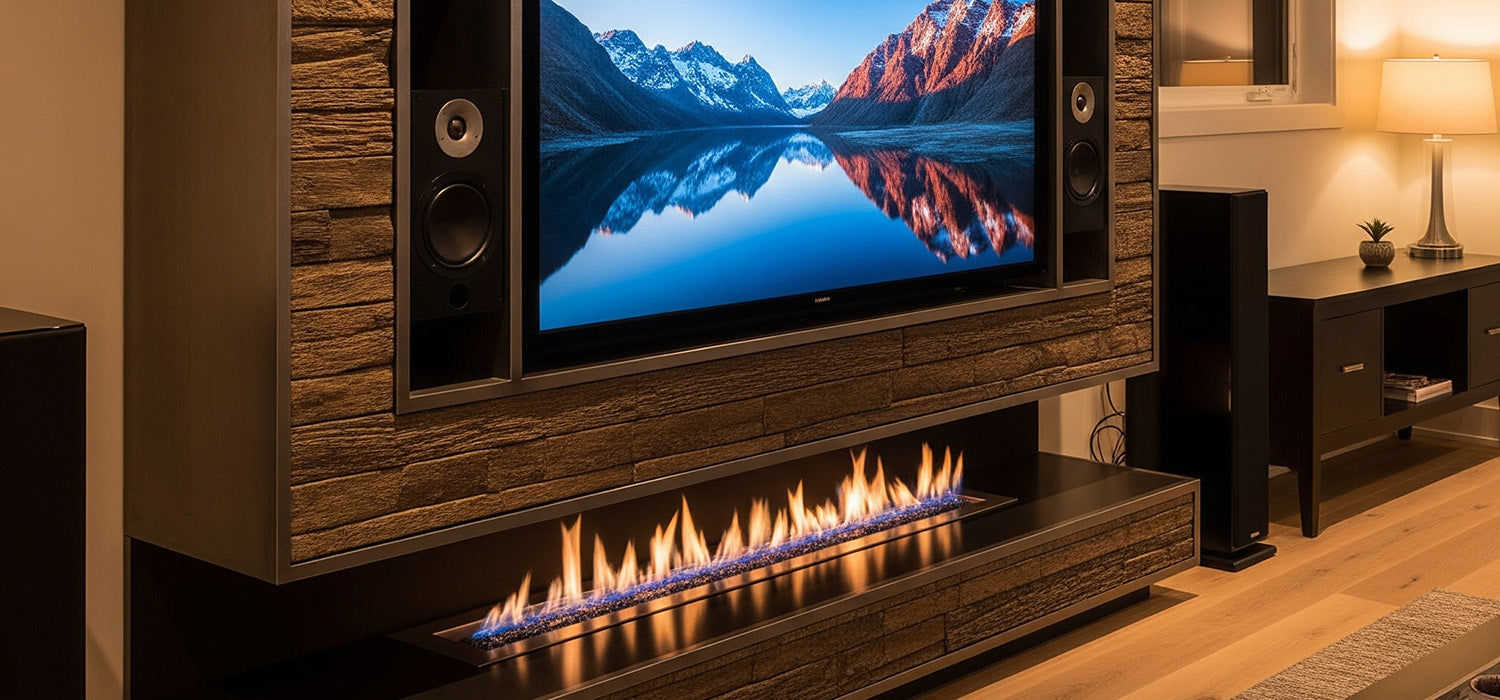
The Anatomy of a Media Wall
At its core, a media wall combines style with serious functionality. You’ve likely seen them on Pinterest or those snazzy home makeover shows.
Framing, Panelling, Backboard, Finishing
-
Framing: This gives your media wall its shape—usually made from timber or metal studs.
-
Panelling: Encloses the frame using plasterboard or MDF for a smooth finish.
-
Backboard: Holds heavy fixtures like the TV—usually strong plywood.
-
Finishing: From paint and trim to ambient lighting, this is where the magic happens.
Why Bother Building a Custom Media Wall?
Because your living room deserves more than a standard TV stand, that’s why.
Perfect Fit, Personalised Design, Hidden Wiring
A custom media wall adapts to your home perfectly—no weird gaps or clunky fittings. You get to decide where everything goes: the TV, shelves, sound system, and of course, the Media Wall Fire.
More importantly, you can wave goodbye to the chaos of trailing wires. Every gadget gets its own hidden home.
The Essential Stages of the Build
Media wall construction doesn’t have to be complicated. But it does have steps.
From idea to reality, here’s the journey:
-
Planning and measuring
-
Building the frame
-
Installing cables and sockets
-
Adding the panels and creating niches
-
Sanding, finishing and decorating
-
Mounting the TV and optional fireplace
Planning and Design: The Foundation of Your Media Wall
Great builds start on paper. Or at least with a tape measure.
Assessing Your Space and Requirements
Room Dimensions, TV Size, Viewing Distance
Start by measuring your wall. Then measure your TV. Make sure your screen will sit at eye level when you’re sat on the sofa.
Pro tip? The ideal viewing distance is around two to three times the screen’s height.
Storage Needs (Devices, Books, Decor)
Think about what you actually use. Consoles? Speakers? Hidden shelves for clutter or open ones for your record collection?
Plan for it now. Regret later is avoidable.
Drawing Up Your Design Plans
Sketching Layouts, Dimensions, and Features
Use pencil and paper or a design app. Make it to scale if you can. Plot your TV, fireplace, shelves, and sockets. This isn’t just about aesthetics—it’s about practicality.
Considering Integrated Fireplaces, Shelving, Cabinetry
Thinking of adding a Media Wall Fire? Good call. Just remember it needs clearance, so double-check the specs.
Cabinetry, whether open or closed, adds both storage and style. Balance your design so it doesn’t look overloaded.
Budgeting and Material Sourcing
It’s easy to go overboard. Costs can add up fast—especially if you’re adding lighting, soundbars, or that must-have oak veneer. Plan a budget and stick to it (with a little wiggle room).
Essential Tools and Safety Gear
Get your tools sorted: drill, saw, level, screwdriver, and stud finder. Don’t forget protective kit—goggles, gloves, dust mask, and a basic first aid set.
Step-by-Step Media Wall Construction
Step 1: Building the Frame (The Skeleton)
Material Selection (Timber Studs, Metal Studs)
Timber is usually the go-to. It’s strong, widely available, and easy to work with. Metal’s lighter but needs specialist fixings.
Measuring and Cutting the Framework Components
Cut everything to length. Label the parts. Trust us—it saves time when you're juggling verticals and horizontals.
Assembling and Securing the Frame to the Wall
Locate the wall studs and screw your frame securely into place. Floor and ceiling anchors matter just as much.
Ensuring Level and Plumb Construction
Use a level—often. It’s the easiest way to avoid wonky results. One degree off now = lifelong regret.
Step 2: Integrating Cable Management and Electrical
Planning Outlet Locations and Cable Pathways
Where will your TV plug in? Where will the fire’s cable run? Think before you build. Sketch out your plan.
Installing Conduit or Cable Tubes
Plastic trunking keeps cables neat and future-proofed. Leave access panels if you want to add gadgets later.
Professional Electrical Work (if required)
If you're adding sockets, moving electrics or installing a Media Wall Fire—bring in a qualified electrician.
Step 3: Installing the Backboard (TV Mounting Support)
Material (Plywood) and Thickness Recommendations
Use 18mm plywood to mount your telly. It holds the weight and spreads the load.
Securely Attaching to the Frame
Fix it tightly to at least two studs. You don’t want your screen doing a nosedive mid-film.
Step 4: Applying Panelling / Boards
Materials (MDF, Plasterboard, Plywood)
Choose based on your finish. Plasterboard is perfect for painting. MDF works better for painted panelling or cladding.
Cutting and Attaching Panels to the Frame
Screw along every stud. Pre-cut niches for TV and fireplace. It’s worth checking dimensions twice.
Creating Niches and Openings
Use a jigsaw for clean, rounded corners. A wonky opening is a pain to hide.
Step 5: Finishing and Detailing
Taping, Jointing, and Skimming
Use scrim tape on joints. Fill and skim until smooth. Sand between coats if needed.
Priming and Painting
Primer matters—it seals the surface. Then choose a colour that sets the tone: charcoal for drama, white for brightness.
Adding Trim, Architrave, and Skirting Boards
Finish edges with style. Match existing mouldings or add contrast for extra character.
Installing Lighting (LED strips, spotlights)
LED strips behind the telly or shelves add real atmosphere. Conceal wiring in shallow channels or recesses.
Key Things to Keep in Mind During the Build
Structural Integrity for TV Mounting
Never fix directly into plasterboard. Always mount the TV into studs or backboard.
Ventilation for Electronic Devices
Leave space around electronics. Especially if you’re closing them in behind cupboard doors.
Soundproofing (Optional)
You can add rock wool or insulation panels behind the wall if you’re worried about noise through shared walls.
Fireplace Integration (Safety Regulations)
Electric or bioethanol fires only. Follow clearance rules in the manual—no exceptions.
Common Problems and Smart Fixes
Dealing with Uneven Walls or Floors
Shim the frame to correct slopes. It’s common in older UK homes. Use spacers or packers to get things level.
Ensuring Accurate Measurements
If in doubt, re-measure. A centimetre off now could mean recutting every panel later.
Overcoming Cable Management Hurdles
Can’t bury cables in solid walls? Use surface trunking or build an access hatch. Don’t trap wires permanently.
Wrapping Up: Time to Enjoy Your Media Wall
Your build is done. The telly is up. The Media Wall Fire is glowing. You’ve built more than a wall—you’ve built a space that feels like yours.
With smart planning, steady hands, and maybe a few strong cups of tea, this DIY project can transform your room. Just don’t be surprised when everyone wants movie night at yours.
Other content we think you'll love
- Bedroom Media Wall Ideas: Create a Stylish & Cosy Retreat
- Corner Media Wall Ideas: Smart Design for Tricky Spaces
- How to Build a Media Wall Over Carpet Safely and Securely
- Black Media Wall Ideas for Bold & Stylish Living Spaces
- How to Build a Media Wall Backboard for a Sleek TV Setup
- Media Wall Cladding: Add Texture, Style and Wow Factor
- Media Wall Covering: Stylish Finishes to Elevate Your Space